Hard Drive Access
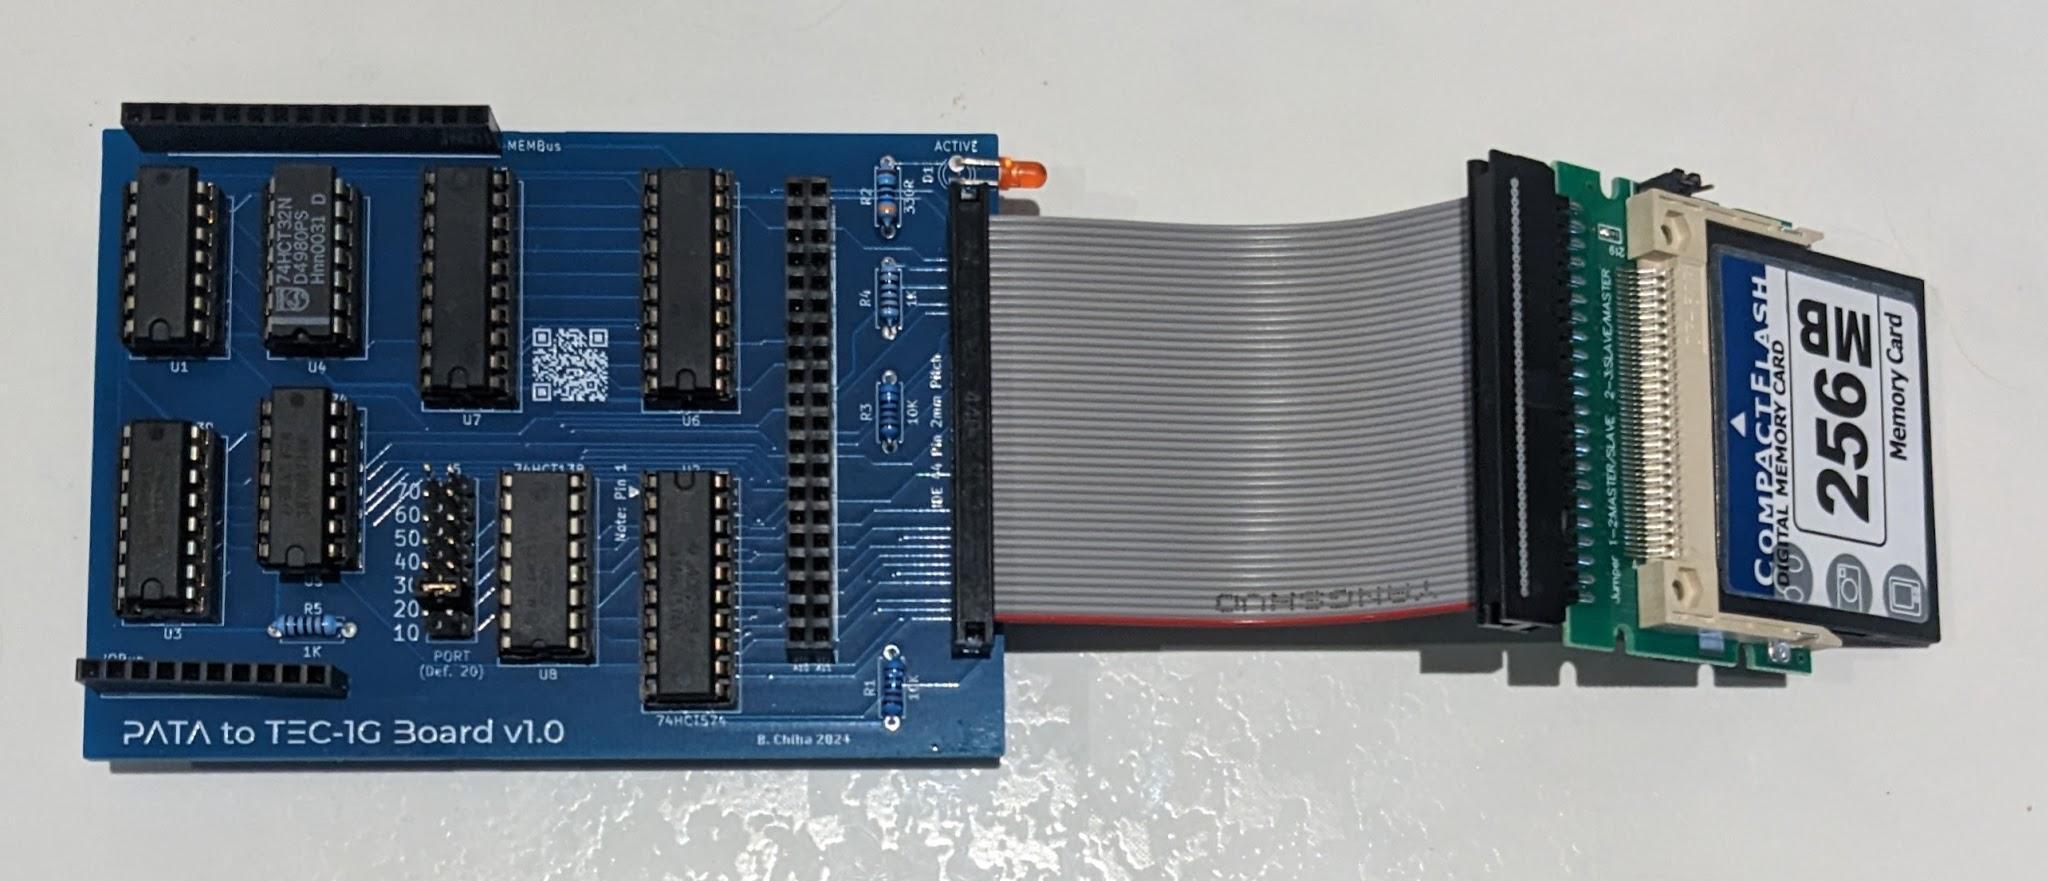
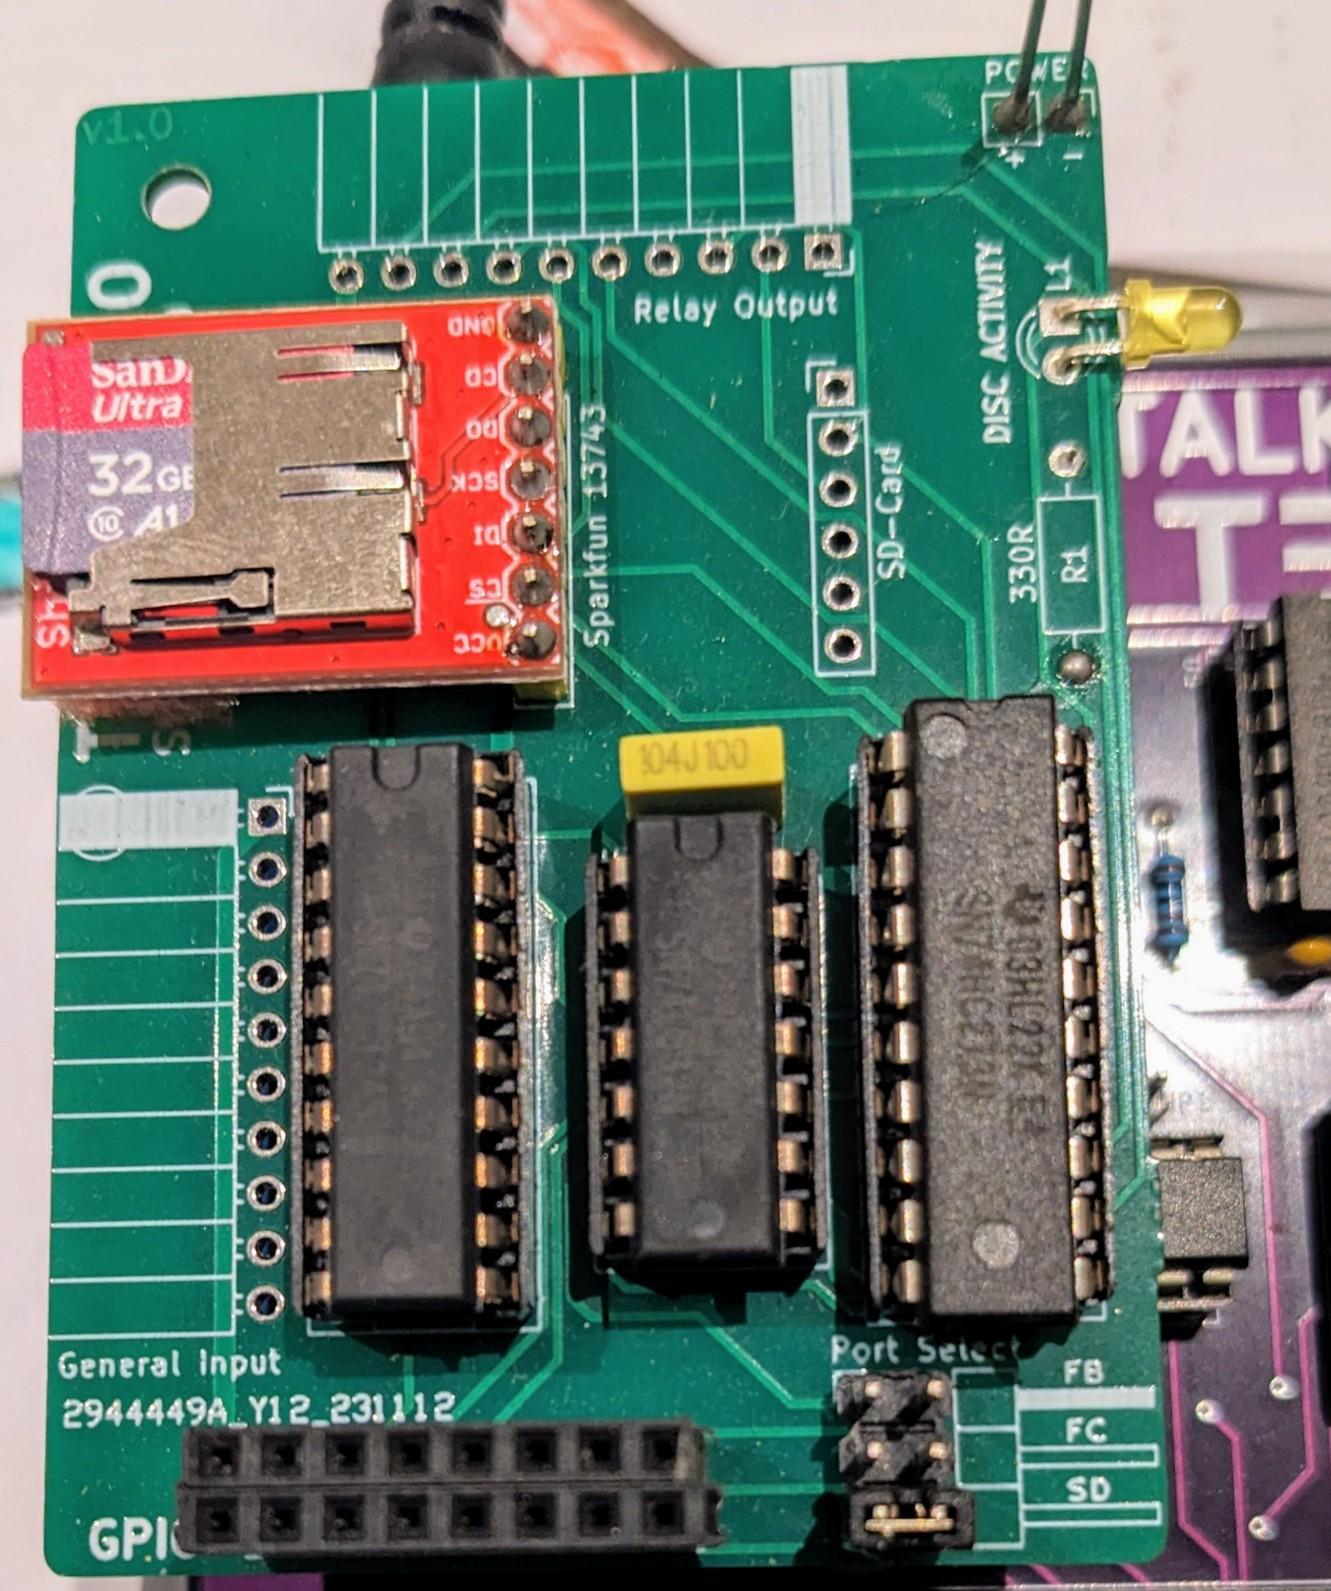
Mon3 has the ability to read and write to files from certain Hard Drives and Solid State cards with Add-On boards. There are two boards that will give access to these drives, The GPIO/SD board and the PATA board. The GPIO board connects a Micro SD card and uses the General Purpose IO port. The PATA board connects a PATA laptop hard drive or a Compact Flash card and uses the TEC Deck connector.
                                           In terms of the particular medium used
                                           to store files, there are a few things to
                                           note:
                                               -   FAT32 (File Allocation Table) is the
                                           only file system Mon3 recognises.  The
                                           drive must be formatted using FAT32
                                           and be on the first MBR Partition.
                                               -   Mon3 looks at the Root (top level)
                                           directory for files.  A maximum of 49
                                           files can read from the drive.
                                               -   Only short name files are
                                           displayed.  Short file names use up to 8
                                           characters for the file name and 3 for
                                           the extension.  IE: "INVADERS.HEX".  If a
                                           file has a longer name, the FAT32
       system automatically creates a shortened version.
With FAT32, files can be seamlessly copied from your PC/MAC to the drive. A USB to drive reader is required, which can be easily found.
Access to the Drive
Catalog
If both GPIO and PATA boards are connected to the TEC, Mon3 will prioritise the GPIO board then the PATA board. Details of the Add-on Boards can be found in the TEC-1G GitHub repository.
Mon3 can only Read or Write to existing files. There is no ability to create new files from the TEC to the drive. To transfer code from the TEC to the drive, first, use the EXPORT RAW DATA menu option to transfer the code via Serial to your PC/MAC. Then copy the binary from your PC/MAC to the drive via a USB to SD/PATA/CF adaptor.
Access to the Drive
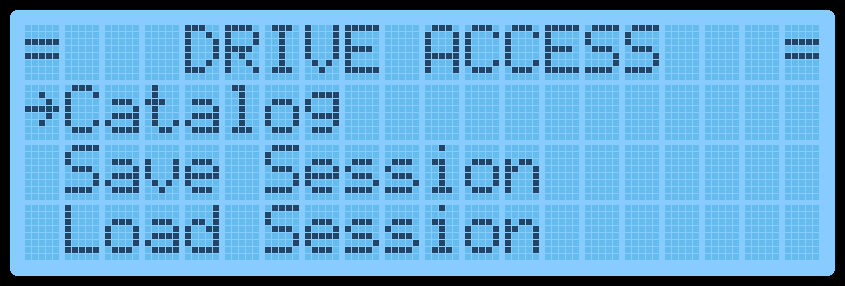
In the Main Menu, select DRIVE ACCESS. A menu will be displayed with three options. Catalog, Save Session and Load Session. These options also have shortcuts in Data Entry mode.
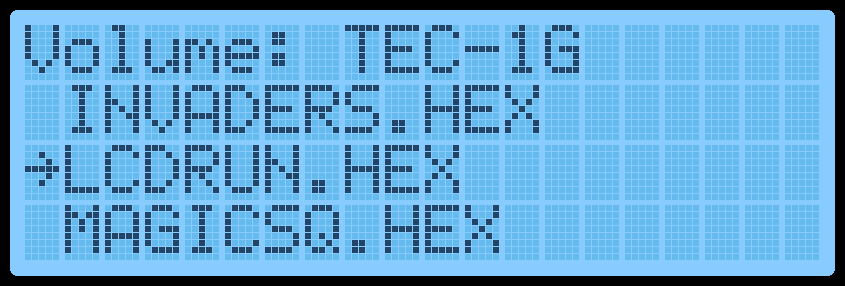
Catalog Catalog will display a list of readable files in the root directory of the drive. Catalog can also be access by from Data Entry mode by pressing Fn-F. If Mon3 finds files on the drive, they will be displayed on the LCD screen.
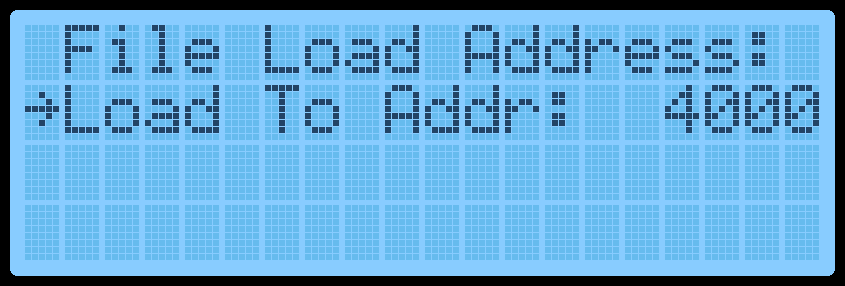
Use Plus/Minus to select the file to load and GO to load the file. AD will exit back to the Menu. If the file has the extension *.HEX, it is assumed that this file is in Intel Hex format and it will automatically convert the file to binary prior to loading. Any other extension will ask for a Start Address as to where the file is to be loaded at.
Save / Load Session
See the Useful Links section below on how to load your drive with ready to run TEC-1G files.
The entire contents of RAM can be saved to a file and loaded back to the TEC. This is an equivalent to saving/restoring a session. It replaces any need to use Non-Volatile RAM. It can be used prior to powering down to save any unfinished work. Then be able to access the same machine state later on.
As Mon3 can’t create files, the session file must be created on your PC/MAC. The filename must be called “MYDATA.TEC” and be exactly 64 Kb in size. The file can be easily created using the following command line statements.
 O/S                 Command

 MS Windows          >fsutil file createnew MYDATA.TEC 65536

 MAC OSX             $dd if=/dev/zero of=MYDATA.TEC bs=65536 count=1
A File Not Found error will appear if Mon3 can’t find the MYDATA.TEC file on your drive.
Save Session will save normal RAM between 0000H-BFFFH and Expansion RAM if any between 8000H-BFFFH. Save Session can also be access in Data Entry mode by pressing Fn-6.
Load Session does the reverse of Save Session. It will ask to Confirm this task as it will overwrite all existing RAM data. Load Session can also be access in Data Entry mode by pressing Fn-7.
Error Messages
While the drive is being accessed, the LCD will display the current progress.
If any errors occur while accessing the drive, an error message will be displayed on the LCD and the code will exit after a key is pressed.
Error messages descriptions are below:
 Message                  Description

 Disk Timeout             No Communication with PATA drive

 Data Not Ready           Read data request failed

 IDE ERR IO Bad           Data transfer error

 Can't read MBR           Couldn't read sector 0 of drive

 MBR Illegal              Malformed MBR record

 BPB Read Fail            Bios Parameter Block of FAT32 not found

 Byt/Sec != 512           FAT32 Bytes per Sector is not 512

 Root Dir Read            FAT lookup of sector failed

 File Not Found           File selected not found in menu configuration

 Bad Checksum             HEX file is corrupt

 No SD Card               SD Card not found

 OCR Read Fail            SD Addressing mode illegal

 Invalid SDCard           SD Card can't be used

 CMD16 Failed             SD Block size can't be set to 512

 Addr. Too Big            Read Sector address greater then file size
Drive Access API Calls
Special API calls have been created to help with opening, reading and writing to files within your own code. The details of these calls and their limitations are described below.
loadFromDisk #58 (3AH) Catalog the files on the disk and display them on the LCD Display for loading. This is the same as selecting CATALOG from the main menu or Fn-F from data entry mode.
- Input: None
- Destroy: ALL
    ld c,58         ;loadFromDisk
    rst 10H
openFile #59 (3BH) Open a file for reading or writing. The routine will exit cleanly if success or an error will be displayed if file isn’t found. The filename is case sensitive and must match exactly. The file must already be existing on the drive.
- Input: HL = Pointer to zero terminated File name
- Destroy: ALL
    ld hl,filename     ;address of file text
    ld c,59            ;openFile
    rst 10H
filename: .db “TBASIC.HEX”,0
readSector #60 (3CH) Load a sector from the opened file. Requires openFile to be called prior but only once. A sector, which is 512 bytes, will be loaded at address 0600H-07FFH. The input is the byte address in the file. The entire sector where that byte is will be returned. An error will display if the input byte is bigger than actual file size.
- Input: HLDE = address in bytes of block to read
- Destroy: ALL
    ld hl,0001H     ;upper byte
    ld de,2575H             ;lower byte
    ld c,60         ;readSector
    rst 10H
This example will read the sector that contains the byte 12575H and place that sector in address 0600H-07FFH.
writeSector #61 (3DH) Write a sector to an opened file. Requires a readSector to be called first. The sector will be saved back to the same position in the file from the readSector routine. To use this routine, firstly call the readSector routine. Data at address 0600H-07FFH can then be altered and a writeSector can be called to save the modifications back to the file.
- Input: None
- Destroy: ALL
    ld hl,0001H     ;upper byte
    ld de,2575H             ;lower byte
    ld c,60         ;readSector first
    rst 10H

;      ** Modify data at 0600H-07FFH here

    ld c,61         ;writeSector
    rst 10H
This example will read a sector first, make some modifications and then write it back to the file.